|
Before you use Harvest Webstation, you must establish security
settings and you may configure program preferences, modify advanced configuration options, enable label printing, or customize
the footer.
Customizing the Harvest Webstation Footer
You may add a custom footer with your own logo or text to the bottom
of all of the pages displayed in Harvest Webstation (except for printable
reports).
To do so, you must complete the following steps:
- Create a file called "custom.html."
- Enter the code for the footer in the "custom.html" document.
You may use your own code or modify the code provided below if you want
to use the same format as the default footer.
- Copy the following code into the "custom.html" document
to use the default footer format.
<!-- Sample Custom Copyright and Logo -->
<CENTER>
<P>
<BR>
<IMG SRC="/custom.jpg" ALT="Custom Logo">
<BR>
<DIV CLASS=FooterText>© 2008 Custom Laboratory</DIV>
</P>
</CENTER>
- Change the "custom.jpg" reference to the graphic file
that you would like to display, if desired. If you are using a custom
footer with an SSL connection, make certain you use the correct "https://"
address for the graphic or link to it directly (see below).
- Enter the text that you want to appear as the alternate text (ALT)
in place of "Custom Logo." Make certain that you have quotes
around the text that you wish to use.
- Replace the copyright information ("© 2008 Custom Laboratory")
with your own company information.
- Place both the "custom.html" file that you created and the
graphic file that you wish to use (if applicable) in the main web folder
that is located within the Harvest application folder.
- When creating a custom footer that will be used with an SSL connection,
you should not include any links to graphics that begin with "http://".
Your browser will view this as unsecured data, and will give an error
that both secure and unsecure data is being displayed on the page. To
fix this, either use "https://" in the full path name of the
graphic, or place the graphic in the same folder as the custom footer
text and link to it directly.
For example:
<IMG SRC="http://www.orchardsoft.com/image.jpg">
should be changed to:
<IMG SRC="https://www.orchardsoft.com/image.jpg">
or you should use:
<IMG SRC="/image.jpg"> (with the graphic placed in
the same Web root folder as the custom footer)
- When Harvest Webstation finds the custom.html file, it will display
the text and/or graphics that you provided in place of the default footer.
Adding a Secure Site Seal to Your Custom Footer
- An alternative to the sample given above demonstrates how to display
not only your facility's logo, but also a Secure Site seal provided
by the Certifying Authority, in your footer. This example is from the
Orchard Software Test Server, which uses a 128-bit SSL certificate from
the GeoTrust corporation:
<p> </p>
<center>
<table width="75%" border="0" cellpadding="0">
<tr valign="top">
<td align="center">
<img src="/orchard.gif" alt="Orchard Software Corporation">
<br>
<div class=FooterText>© 2008 Orchard Software Corporation</div>
</td>
<td valign="center">
<!-- GeoTrust QuickSSL [tm] Smart Icon tag. Do not edit. -->
<SCRIPT LANGUAGE="JavaScript" TYPE="text/javascript" SRC="//smarticon.geotrust.com/si.js"></SCRIPT>
<!-- end GeoTrust Smart Icon tag -->
</tr>
</table>
</center>
Note: You will need to use the exact JavaScript and secure site image
provided to you by your Certifying Authority.
- Based on the example above the custom footer will look similar to this:

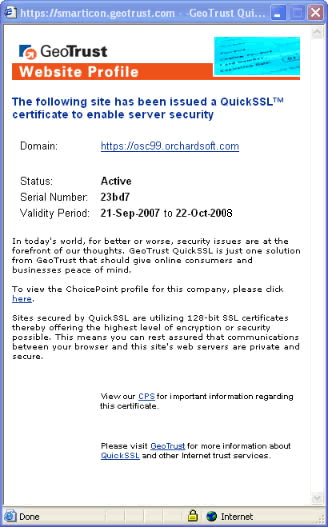
- Based on the example above, clicking on the Secure Site image opens
a small browser window that displays the real-time status of your SSL
certificate, which will look similar to this:
|